In Debian Server, Tomcat can be installed at a few possible location such as
- /usr/share/tomcat8
- /var/lib/tomcat8/ (Note : this is where Tomcat is installed in KWT server)
- /opt/tomcat8
However, our web application are to be placed inside the "webapps" folder. For example, for KWT server, your web application should be placed in :
- /var/lib/tomcat8/webapps/
First, use ssh client to access your server. Then, go to this directory : cd /var/lib/tomcat8/webapps/
Create a directory with your project name : mkdir projectRaf
Create a simple index.html page to test our project page : touch index.html
Insert something (anything) to that file : echo "this is my project page" > index.html
Go to your project page. For KWT, this will be http://{your-server-IP-here}:8080/projectRaf and the content of the index.html should be displayed. Note that 8080 is the port used by Tomcat. For comparison, Apache2 web server uses port 80, which is the default port for all browser (you don't have to specify the port for Apache2 web server). For Tomcat, you need to specify the port 8080.
2. Revise on the Java Servlet's operation.
If you haven't, you should go through this note again : http://nextslides.blogspot.my/2017/01/beginning-to-web-app-developement-web.html
Make sure you understand the use of HTTP POST and HTTP GET as well as Servlet Mapping.
If you haven't, you should go through this note again : http://nextslides.blogspot.my/2017/01/beginning-to-web-app-developement-web.html
Make sure you understand the use of HTTP POST and HTTP GET as well as Servlet Mapping.

Handling form data represented in HTML page is a very common task in web development. A typical scenario is the user fills in fields of a form and submits it.
The server will process the request based on the submitted data, and send response back to the client - this is what our Java Servlet does.
3. Create simple form (Front end)
Luckily, Bitvise SSH Client comes with SFTP Window browser. This allow us to graphically transfer file from our local to our server, specifically to Tomcat's webapps folder


Edit our index.html and put in the following :

Form attributes :
- method=”post” : to send the form data as an HTTP POST request to the server.
Remember the difference between HTTP POST and HTTP GET? - action=”servlet--URL” : specifies the URL of the servlet.
Remember what is Servlet-mapping? This is the usage of that mapping.
Once done, copy and overwrite the index.html on the server. Then go to the project URL, you should see something like below :

Note that this is a simple form. We will use this similar index.html file in our Eclipse project below.
4. Create Servlet using Eclipse (Back End)
For simplicity, we use the following tutorial : http://www.studytonight.com/servlet/creating-servlet-in-eclipse.php
5. Change the Servlet code
On the server side, we need to create a Java servlet which want to be mapped to loginServlet, as specified in the form’s action attribute (see our index.html above). Following is code snippet of the servlet, using the annotation method, specifically on the doPost( ) method
You may want to change the package name to yours.
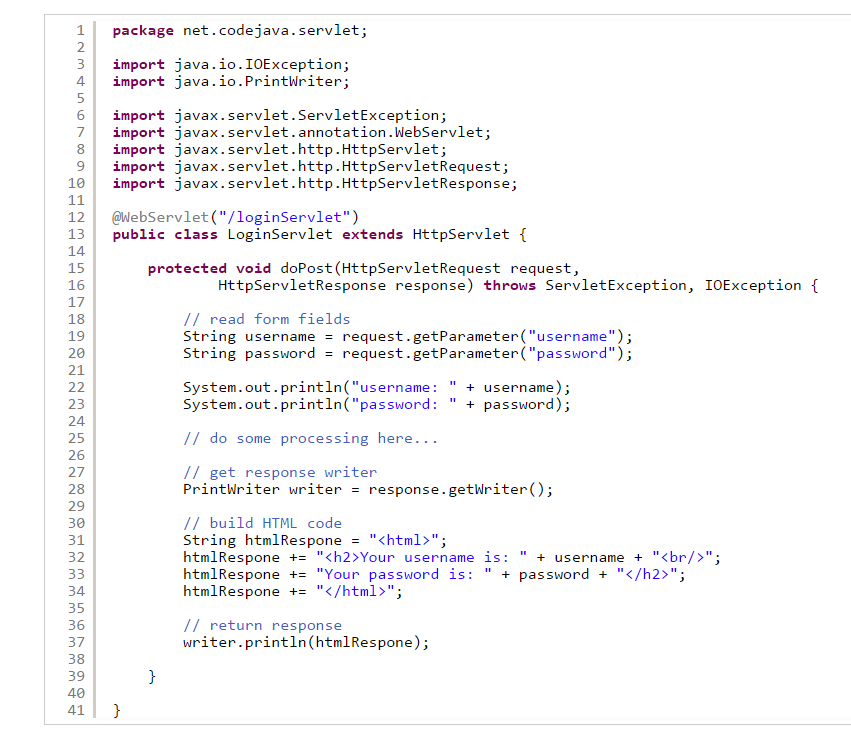
6. Understand the Servlet
Notice that the servlet’s URL is specified by the @WebServlet annotation before the servlet class.
When the user submits the login form above, the servlet’s doPost() method will be invoked by the servlet container.
Typically we will do the following tasks inside doPost() method:
- Read values of the fields posted from the form via the request object (implementation of javax.servlet.http.HttpServletRequest interface).
- Do some processing, e.g. connecting to database to validate the username and password.
- Return response back to the user via the respone object (implementation of javax.servlet.http.HttpServletResponse interface).
To read values of form’s fields, the HttpServletRequest interface provides the following methods:
- String getParameter(String name) : gets value of a field which is specified by the given name, as a String. The method returns null if there is no form field exists with the given name.
- String[] getParameterValues(String name) : gets values of a group of fields which have same name, in an array of String objects. The method returns null if there is no field exists with the given name.
Usage :
String username = request.getParameter("username");
String password = request.getParameter("password");
To send response back to the client, we need to obtain a writer from the response object by calling the method getWriter() of the HttpServletResponse interface:
PrintWriter writer = response.getWriter();
Then use the print() or println() method to deliver the response (in form of HTML code).
For example :
String htmlRespone = "{create-html-out-here}";
writer.println(htmlRespone);
6. Include index.html

According to this strucure, we can include our index.html direcly on our project's WebContent root on Eclipse. You can either copy the index.html and drag onto WebContent folder on Eclipse or create a new index.html file and just copy paste the content we have written previously.
7. Create a war file of our project and export to server
On Eclipse, right-click on the project name > Export > WAR file
Use the Bitvise SSH client SFTP window tool to transfer our war file to server Tomcat's webapps folder.
Note that when the war file are complely transferred to Tomcat's webapps folder, it will be automatically uncompressed into our project folder.
Access our project URL to see our deployed web application (index.html + simple Servlet).
Note that when the war file are complely transferred to Tomcat's webapps folder, it will be automatically uncompressed into our project folder.
Access our project URL to see our deployed web application (index.html + simple Servlet).