Downloadable file : Substitution Cipher
import java.util.HashMap;
import java.util.Iterator;
import java.util.Map;
public class subs_cipper {
public static void main(String[] args) {
System.out.println("This is to demonstrate the Substitution Cipher");
System.out.println("Each alphanumeric char is mapped to a String (arbitrarily, of two chars length)");
System.out.println("For example, 'A' is mapped to \"OA\", 'B' is mapped to \"9B\", and so on...");
System.out.print("\nTest String = ");
String plaintext = "WHYAMIDOINGTHISWHYAREWEHEREWHATAREWEDOING";
//string to be ciphered
//String plaintext = "ABCDEFGHIJKLMNOPQRSTUVWXYZ1234567890";
//use this to check. With this,
//...plaintext = Keys, and Ciphertext = Values
System.out.print(plaintext);
//Encryption
System.out.println("\n\nCiphertext = ");
Cipher ObjCipher = new Cipher();
String ciphertext = ObjCipher.Encrypt(plaintext);
//output ciphered string
System.out.println(ciphertext);
//Decryption
System.out.print("\nPlaintext = \n");
String outplaintext = ObjCipher.Decrypt(ciphertext);
//output deciphered string
System.out.print(outplaintext);
}
}
//the class that that implements the actual encryption
class Cipher {
String keys, values;
//Keys & Values for HashMap
String plaintext, ciphertext;
HashMap<String, String> map = new HashMap<String, String>();
//HashMap to do the mapping
//constructor, instantiates the HashMap
public Cipher(){
//one-to-one mapping (Keys - Values) of different length. In this example,
//A:OA, B:9B, C:8C & so on...
keys = "ABCDEFGHIJKLMNOPQRSTUVWXYZ1234567890";
values = "0A9B8C7F6E5R4F3T2J1K4LX2VN18K9LC42B7" +
"ABCDEFGHIJKLMNOPQRSTUVWXYZ1234567890";
//use for loop to fill up & map the Keys to the respective Values
for (int i=0; i<keys.length(); i++){
char charkey = keys.charAt(i);
//get each char from the Keys & convert to String
String tempkey = Character.toString(charkey);
char charval1 = values.charAt(i*2);
//get every two chars from the Values & convert to String
String tempval1 = Character.toString(charval1);
//...and concatenate both chars to form a single String
char charval2 = values.charAt(i*2+1);
String tempval2 = Character.toString(charval2);
String tempval = tempval1 + tempval2;
map.put(tempkey, tempval);
//fill the HashMap
}
}
//Encrypt method, do the Encryption, takes Plaintext as argument
public String Encrypt(String plaintext){
String output = "";
char ch;
for (int i=0; i<plaintext.length(); i++){
//go through the plaintext
ch = plaintext.charAt(i);
//take each chars as 'Key'
String str = Character.toString(ch);
//..and map to its corresponding 'Value'
output = output + map.get(str);
}
return output;
//returns the the encrypted String
}
//Decrypt method, do the Decryption, takes Ciphertext as argument
public String Decrypt(String ciphertext){
String output = "";
char ch;
String str = "";
for (int i=0; i<ciphertext.length(); i = i+2){
//get next two adjacent chars from the Ciphertext
ch = ciphertext.charAt(i);
//concatenates them into a single String
str = Character.toString(ch);
ch = ciphertext.charAt(i+1);
str = str + Character.toString(ch);
Iterator j = map.entrySet().iterator();
//look up through HashMap by the Value
while (j.hasNext()) {
//...to find the corresponding Key
Map.Entry entry = (Map.Entry) j.next();
if (str.equals((String)entry.getValue())){
//concatenates the output with each Key found
output = output + (String)entry.getKey();
}
}
}
return output;
//return the Decrypted String
}
}
September 24, 2013

September 6, 2013
UI design (again!)
Since we have passed the first demonstration, it's time now to design for the final prototype. I have considered a few ideas of how our App will look like, and what kind of functionality that we will be offering. Unline UniKey, we don't have our system connected to the net, which makes our system simpler than theirs (apart from more secured, that's it). These are the interfaces that I came out with, as of now.


What do you think?
August 26, 2013
First prototype
So we decided that 3D printing service will take quite a little bit of time and we are not yet ready to finalize the design for it, among other things (the cost is a headache too!). Since the first presentation is just around the corner, we gonna go with a quicker solution : a prototype made wholly out of wood. We have been going around the hardware shops nearby and finally able to get some good looking woods for our project with cheap cost.
Due to the lock requires drop bolt hole component to be mounted, a stand for it is needed. The lock senses the component in order to drop the bolt. Since we need to build that stand, we thought it is a good idea to have the electronic lock able to swing just a little bit. At the end, we got ourselves a smaller scale door, which looks 'okay' enough for the presentation. We probably need more than this to impress the moderator, though.
You can get the Sketchup file here : First Prototype


Due to the lock requires drop bolt hole component to be mounted, a stand for it is needed. The lock senses the component in order to drop the bolt. Since we need to build that stand, we thought it is a good idea to have the electronic lock able to swing just a little bit. At the end, we got ourselves a smaller scale door, which looks 'okay' enough for the presentation. We probably need more than this to impress the moderator, though.
You can get the Sketchup file here : First Prototype


Time for part timer carpenters to go to work.
August 25, 2013
A sample RFID based electronic door lock
During the last meeting, Mr Cheong showed us the sample of the electronic door lock from the market. We were informed with some useful information on the regulation of the general door lock (before they can be marketed) here in Malaysia. The sample is a RFID based electronic door lock that also comes with the manual keyhole for the backup. It is actually a better idea to have the similar basic design for our project, albeit it comes with a higher cost.
The sample looks good, and I hope we can build something similar for our demo as well.


The sample looks good, and I hope we can build something similar for our demo as well.


August 21, 2013
2nd try on demo box
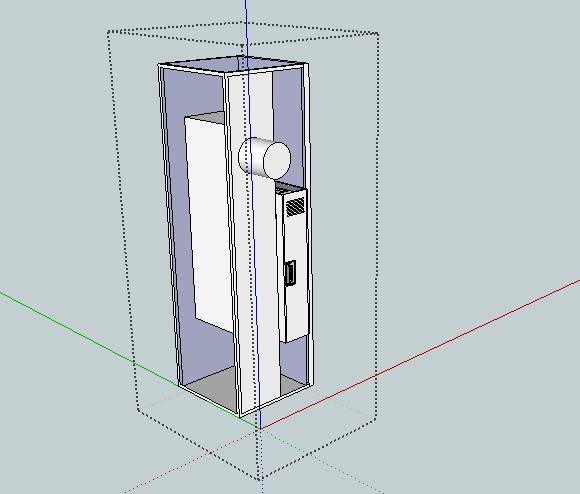
So, we had ourselves a barrier : the 3D printing service can only print at most 20cm X 20cm in size. Our electronic lock itself is already about 19cm, which tells us that we can't print the whole previous design in one shot. What we can do is to print them part by part and combine them together with screws or glue.
So, I gave another shot on how it will sorta look like if we were to go that way. You can get the Sketchup file here : Second Design


So, I gave another shot on how it will sorta look like if we were to go that way. You can get the Sketchup file here : Second Design




August 17, 2013
Building the prototype for demo
For obvious reason, we can't put our system on a real door during demonstration. So, we need a smaller, nice looking way of showing that our system can work.


As you can see, there are pretty big empty spaces inside the box which can fitted with other components if needed (a battery, perhaps?). After asking around on 3D printing service available, I found out that the maximum of the printable size is 20cm x 20cm x 20cm volume. That is one big concern, our lock itself is already 199mm (19.9cm) in length. Trouble!
Well, not entirely true. We have the option to print part by part and gluing them together, but I'm not sure how strong can it be. The material provided are mostly ABS or PLA. ABS is stronger, the kind of material that the car's bumper are made of, but the maximum printable size is about 10cm x 10cm x 10cm due to the warping problem. We still need to design correctly (if you notice, I haven't plug in the Bluetooth dongle into the Rpi yet) and we still need to seek answers!
Here's a little conversation of me and one of the 3D printing service providers:
Hi
I'm gathering info about 3D printing service, which I need for my fyp. I was given your contact...I hope you don't mind, I'd like to ask a few questions:
1. Can I know the price rate for the service? How it depends on the size, weight of material used, complexity...any other applicable etc
2. What is the maximum printable size?
3. Which materials do you guys provide?
4. How to make order? Expected delivery period?
Thanks
The reply:
Hello
1. For 3D printing targeted towards the consumer market, the prices can range from RM5 all the way to RM1,000. For our company, Makerzone, we charge based on weight and time taken (Rm30 per hour) to print an object. The more complex the object is, the longer time it takes to print it so higher cost too. However, we do have substantial discount for students.
2. For our printers currently, our maximum printable size is 20cm x 20cm x 20cm volume. ABS is limited to 10cm x 10cm x 10cm to prevent warping.
3. We provide both ABS and PLA filaments. Honestly after selling products the past few months, the type of filaments that we use do not matter much to our consumers. We also provide post-processing for customers if they want such as polishing the printed object which will make it looks smooth and shiny, painting and chroming.
4. Customers can make orders through our online platform where we host our marketplace of products. We own three websites currently but they are all still under development and not fully functional yet. Please feel free to check them out too.
www.makerzone.net www.makerzone.com.my www.makerzone.sto.my
Please do like our page below too!
https://www.facebook.com/makerzone
It is good that you have a sketch of your design, it makes it so much easier for us to provide a quotation for you. Therefore, you could drop an email to mak@makerzone.net together with your sketchup design for him to provide validation and quotation. Expected delivery period is within 5 working days.
The Kevo's demonstration uses a small box made of wood, which is actually looks nice and serve the purpose (shows how the system works) nicely. You can watch it from the video:
However, due to lack of time and resources, we have opted to build our prototype for demo by using 3D printing service. With some serious lack of creativity, I tried designing using the same idea, just to see how we can arrange our system components inside the box. This is, by no mean, the final design.


As you can see, there are pretty big empty spaces inside the box which can fitted with other components if needed (a battery, perhaps?). After asking around on 3D printing service available, I found out that the maximum of the printable size is 20cm x 20cm x 20cm volume. That is one big concern, our lock itself is already 199mm (19.9cm) in length. Trouble!
Well, not entirely true. We have the option to print part by part and gluing them together, but I'm not sure how strong can it be. The material provided are mostly ABS or PLA. ABS is stronger, the kind of material that the car's bumper are made of, but the maximum printable size is about 10cm x 10cm x 10cm due to the warping problem. We still need to design correctly (if you notice, I haven't plug in the Bluetooth dongle into the Rpi yet) and we still need to seek answers!
Here's a little conversation of me and one of the 3D printing service providers:
Hi
I'm gathering info about 3D printing service, which I need for my fyp. I was given your contact...I hope you don't mind, I'd like to ask a few questions:
1. Can I know the price rate for the service? How it depends on the size, weight of material used, complexity...any other applicable etc
2. What is the maximum printable size?
3. Which materials do you guys provide?
4. How to make order? Expected delivery period?
Thanks
The reply:
Hello
1. For 3D printing targeted towards the consumer market, the prices can range from RM5 all the way to RM1,000. For our company, Makerzone, we charge based on weight and time taken (Rm30 per hour) to print an object. The more complex the object is, the longer time it takes to print it so higher cost too. However, we do have substantial discount for students.
2. For our printers currently, our maximum printable size is 20cm x 20cm x 20cm volume. ABS is limited to 10cm x 10cm x 10cm to prevent warping.
3. We provide both ABS and PLA filaments. Honestly after selling products the past few months, the type of filaments that we use do not matter much to our consumers. We also provide post-processing for customers if they want such as polishing the printed object which will make it looks smooth and shiny, painting and chroming.
4. Customers can make orders through our online platform where we host our marketplace of products. We own three websites currently but they are all still under development and not fully functional yet. Please feel free to check them out too.
www.makerzone.net www.makerzone.com.my www.makerzone.sto.my
Please do like our page below too!
https://www.facebook.com/makerzone
It is good that you have a sketch of your design, it makes it so much easier for us to provide a quotation for you. Therefore, you could drop an email to mak@makerzone.net together with your sketchup design for him to provide validation and quotation. Expected delivery period is within 5 working days.
August 3, 2013
Python - GUI and MySQL
Since we are going to deploy the system to consumer level, the interface of our application should be intuitive, more or less, looking the same as with other typical desktop applications. And to some extent, it should resemble our Android App in the design.
We have decided to use MySQL for the database of our application. For web application, I am most certain that PHP would be the best to use. However, we would want a standalone desktop application for our system. The desktop application should be able to execute these 3 main general functions:
We have decided to use MySQL for the database of our application. For web application, I am most certain that PHP would be the best to use. However, we would want a standalone desktop application for our system. The desktop application should be able to execute these 3 main general functions:
1. Communicate with our MySQL database (of course!)
2. Communicate with Rpi via bluetooth
3. Communicate with Android App via bluetooth.
Since we're using Python on Rpi itself, perhaps it's good for me to explore on how we can use Python in this area as well, eliminating the needs for PHP. We basically know that Python bluetooth communication with Rpi and Android App is implementable. So, what I need to know for now are:
How Python can be used to write a desktop application?
What GUI tools do I need?
Can it be installed in main PC platforms (Windows, Linux, Mac)?
How Python can be used along with MySQL database?
A quick research led me to PyQt, a Python way of using cross-platform GUI toolkit, QT. From the Wiki page of PyQt, there are other GUI toolkits available for Python as well. However, we'll stick to PyQt for now due to the fact that it is cross-platform. I have implemented Qt before in my Object Oriented programming course - I wrote a Hang Man's words game and used Qt for the drawing.
Below is the introductory video on PyQt and here is a good tutorial site for PyQt : Link.
Below is the introductory video on PyQt and here is a good tutorial site for PyQt : Link.
I also found out that, similar to PHP, Python can also be used with MySQL with ease. These two links below shows how it is done. I'll try these out later when I want to get started with our desktop application.
Link 1 : Connecting to MySQL with Python and PHP
Link 2 : MySQL Python tutorial
August 2, 2013
New GUI Design
I just saw this App and I thought it looks simple, clean and nice. I am a big fan of simplicity. So, I decided to draw using the similar theme for our App. I'll code this later.


GUI Design
I have not been focusing on GUI design yet as I prefer to make sure some basic functions for the App are working first. The idea is to write these different functions separately into multiple temporary Apps for testing/debugging and then I'll combine these into our final App. Even so, I did play around with the Android GUI just to get the feel of them.
The Eclipse provides basic drag and drop with their graphical tools but sometimes they could go wrong. The attributes of each view that we use can be incorrectly set up by the tools and although it looks nice on Eclipse, it isn't so on your phone. Also, we need to cater to different screen sizes, ensuring that the looks do not go wrong.
So, the best way is to study on these different layout properties first i.e. Grid Layout, Linear Layout, Relative Layout and also Android views. There is also a guidelines for the GUI design at Android Developer site. I have read a good book on this, I'll get back to attaching it here later.
So far, these are a couple of GUI designs that I played with


The Eclipse provides basic drag and drop with their graphical tools but sometimes they could go wrong. The attributes of each view that we use can be incorrectly set up by the tools and although it looks nice on Eclipse, it isn't so on your phone. Also, we need to cater to different screen sizes, ensuring that the looks do not go wrong.
So, the best way is to study on these different layout properties first i.e. Grid Layout, Linear Layout, Relative Layout and also Android views. There is also a guidelines for the GUI design at Android Developer site. I have read a good book on this, I'll get back to attaching it here later.
So far, these are a couple of GUI designs that I played with


I think the best looking one at this moment is the one below. But I still can think of some changes that I can make on the look (Especially our faces right there, haha). If you have any suggestions, comments or samples, go ahead and let me know.

On Phone

On Galaxy Tab
Python server is now working
Earlier, we have a problem in sending the data from the Android App to the Python server on Rpi. I wrote:
"On Rpi, the App shown that connection has been made with the server and data has been successfully sent, but none of those are indicated on the server that I ran"
Well, I was half correct and half wrong.
Based on this thread, the problem lies in the default configuration of Bluez where pnat plugin (a plugin file written in c for Nokia's Maemo platform) is enabled. The plugin effectively breaks any application that tries to run Rfcomm server. Running the App through Eclipse shows "connection reset by peer" error even though initially connection was made. So, the connection was initially made, but it is then terminated by the plugin right at the point where data is to be send.
To fix this, just disable pnat plugin.
1. Navigate to "/etc/bluetooth/main.conf"
2. Edit the file with root "sudo nano main.conf"
3. Append the following "DisablePlugins = pnat" in the main.conf file.
4. Save and Exit - Press 'CTRL-X' and 'Enter'
5. Restart bluetooth by issuing "sudo invoke-rc.d bluetooth restart"

"On Rpi, the App shown that connection has been made with the server and data has been successfully sent, but none of those are indicated on the server that I ran"
Well, I was half correct and half wrong.
Based on this thread, the problem lies in the default configuration of Bluez where pnat plugin (a plugin file written in c for Nokia's Maemo platform) is enabled. The plugin effectively breaks any application that tries to run Rfcomm server. Running the App through Eclipse shows "connection reset by peer" error even though initially connection was made. So, the connection was initially made, but it is then terminated by the plugin right at the point where data is to be send.
To fix this, just disable pnat plugin.
1. Navigate to "/etc/bluetooth/main.conf"
2. Edit the file with root "sudo nano main.conf"
3. Append the following "DisablePlugins = pnat" in the main.conf file.
4. Save and Exit - Press 'CTRL-X' and 'Enter'
5. Restart bluetooth by issuing "sudo invoke-rc.d bluetooth restart"

July 30, 2013
Get started on Android
Although the Android Developer site is pretty comprehensive, I found it is also useful for me to learn Android Developement via videos. TheNewBoston is hands down one of the best tutorial sites for technical knowledge, mainly for programming languages such as C, C++, Java and a couple more. If you haven't gone through his video, do check them here.
Nevertheless, I still think that some important aspects of Android development are best exemplified on Android Developer site and you will find you'll be doing frequent visit to the site. Bookmark it! :-)
You also need to know the Android API site. These explain all available APIs and it will be useful for you in order to understand each and every objects and their methods of within Android's Java. If you use Eclipse, right clicking on the methods will redirect you to this site within the editor itself.
Nevertheless, I still think that some important aspects of Android development are best exemplified on Android Developer site and you will find you'll be doing frequent visit to the site. Bookmark it! :-)
You also need to know the Android API site. These explain all available APIs and it will be useful for you in order to understand each and every objects and their methods of within Android's Java. If you use Eclipse, right clicking on the methods will redirect you to this site within the editor itself.
Installing Python 2.6 and PyBluez on Rpi (or any Debian-based Linux Distro)
My experiment on running the simple server based on Python 2.6 and PyBluez works well in Windows along with the App I've written. I was able to send data from the Android App and the server was able to receive the data and display it.
Implementing native Bluetooth socket on Rpi sent me to a dead end where I could not figure out why it doesn't work and lack of resources to resolve the problem. Although packaged in within the more updated version of Python (Python 3.3), little documentations have been made on it.
On Rpi, the App shown that connection has been made with the server and data has been successfully sent, but none of those are indicated on the server that I ran. Weird? Yes. I have decided to try writing the server with the older Python 2.6 and PyBluez to test if it works.
Installing Python 2.6 in Linux:
1. Download Python 2.6 from here
2. Go to the containing directory (use "cd" command to navigate).
3. Decompress the .tar.gz by using
"tar -xzf Python-2.6.6.tar.gz"
4. Go to the decompressed folder "cd Python-2.6.6"
5. Issues these following command
"./configure
make
sudo make install"
Installing PyBluez in Linux:
1. Download PyBluez from here
2. Go to the containing directory
3. Decompress the .tar.gz by using
"tar -xzf PyBluez-0.18.tar.gz"
4. Go to the decompressed folder "cd PyBluez-0.18"
5. Still in the shell, run "sudo python2.6 setup.py install"
(Note that we run the script using "python2.6" and not "python". "python" will refer to the default installed python which could be Python2.7 or Python 3 which we don't want to use for now. Issuing "python2.6" will ensure that we run our scripts using Python2.6 instead.)
Update: You might get an error that says Python.h is missing. Python.h is a header file written in C++. It is used by gcc to build applications. You need to install a package called python-dev. This package includes header files, a static library and development tools for building Python modules. To install this package, enter: "sudo apt-get install python2.6-dev" targeting our Python2.6. You might also need to install bluetooth header (bluetooth.h). Enter "apt-get install libbluetooth-dev". After these two headers are installed, now you can proceed to installing PyBluez.
Update: It seems that writing the server with Python2.6 and PyBluez gave me the same result. My next try will be writing the server on another language. The problem could be on Python's implementation on Bluetooth with Rpi.
Implementing native Bluetooth socket on Rpi sent me to a dead end where I could not figure out why it doesn't work and lack of resources to resolve the problem. Although packaged in within the more updated version of Python (Python 3.3), little documentations have been made on it.
On Rpi, the App shown that connection has been made with the server and data has been successfully sent, but none of those are indicated on the server that I ran. Weird? Yes. I have decided to try writing the server with the older Python 2.6 and PyBluez to test if it works.
Installing Python 2.6 in Linux:
1. Download Python 2.6 from here
2. Go to the containing directory (use "cd" command to navigate).
3. Decompress the .tar.gz by using
"tar -xzf Python-2.6.6.tar.gz"
4. Go to the decompressed folder "cd Python-2.6.6"
5. Issues these following command
"./configure
make
sudo make install"
Installing PyBluez in Linux:
1. Download PyBluez from here
2. Go to the containing directory
3. Decompress the .tar.gz by using
"tar -xzf PyBluez-0.18.tar.gz"
4. Go to the decompressed folder "cd PyBluez-0.18"
5. Still in the shell, run "sudo python2.6 setup.py install"
(Note that we run the script using "python2.6" and not "python". "python" will refer to the default installed python which could be Python2.7 or Python 3 which we don't want to use for now. Issuing "python2.6" will ensure that we run our scripts using Python2.6 instead.)
Update: You might get an error that says Python.h is missing. Python.h is a header file written in C++. It is used by gcc to build applications. You need to install a package called python-dev. This package includes header files, a static library and development tools for building Python modules. To install this package, enter: "sudo apt-get install python2.6-dev" targeting our Python2.6. You might also need to install bluetooth header (bluetooth.h). Enter "apt-get install libbluetooth-dev". After these two headers are installed, now you can proceed to installing PyBluez.
Update: It seems that writing the server with Python2.6 and PyBluez gave me the same result. My next try will be writing the server on another language. The problem could be on Python's implementation on Bluetooth with Rpi.
July 29, 2013
Raspberry Pi - A Brief Introduction and Basic Setup
Introduction
Raspberry Pi is the small size computer roughly sized as credit card that runs on Linux. The board is relatively very cheap which is $35. The RPi can be used to many things from using is as computer or to make it as small robot. It can be plugged in USB peripherals (keyboards, mice, etc.), output video via HDMI and DVI, or even composite out to an old analogue TV.

Basic Setup
Setting up the RPi is very easy and it will only take in less than 10 minutes to setup and run.
Things needed before start:
- Raspberry Pi
- SD Card(at least 4 gig)
- HDMI supported monitor
- Mouse
- Keyboard
- Power Supply (5V - 1A)
- SD Formatter
- RPi recovery system(NOOBS_v1_2_1.zip)
Setup - RPi:
1. Insert an SD card that is 4GB or greater in size into your computer.
2. Format the SD card so that the Pi can read it by following the steps below.
3. Install the Formatting Tool on your machine.
4. Run the Formatting Tool.
5. Set "FORMAT SIZE ADJUSTMENT" option to "ON" in the "Options" menu.
6. Check that the SD card you inserted matches the one selected by the Tool.
7. Click the “Format” button.
8. Download the NOOBS_v1_2_1.zip from (downloads.raspberrypi.org/recovery).
9. Unzip the RPi recovery system or NOOBS_v1_2_1.zip.
10. Copy the extracted files onto the SD card that you just formatted.
11. Insert the SD card into your Pi.
12. Connect all the connections which is mouse, keyboard and monitor.
13. Finally connect the power supply to the RPi.
Setup - Raspbian
Once boot up for the first time, a menu will prompted(see the image below) you to install one of several operating systems into the free space on the card. The choice means you can boot the Pi with a regular operating system like Raspbian, or with a media-centre specific OS like RaspBMC.

Once Boot up, we now have most low cost computer running.

Raspberry Pi is the small size computer roughly sized as credit card that runs on Linux. The board is relatively very cheap which is $35. The RPi can be used to many things from using is as computer or to make it as small robot. It can be plugged in USB peripherals (keyboards, mice, etc.), output video via HDMI and DVI, or even composite out to an old analogue TV.

Basic Setup
Setting up the RPi is very easy and it will only take in less than 10 minutes to setup and run.
Things needed before start:
- Raspberry Pi
- SD Card(at least 4 gig)
- HDMI supported monitor
- Mouse
- Keyboard
- Power Supply (5V - 1A)
- SD Formatter
- RPi recovery system(NOOBS_v1_2_1.zip)
Setup - RPi:
1. Insert an SD card that is 4GB or greater in size into your computer.
2. Format the SD card so that the Pi can read it by following the steps below.
3. Install the Formatting Tool on your machine.
4. Run the Formatting Tool.
5. Set "FORMAT SIZE ADJUSTMENT" option to "ON" in the "Options" menu.
6. Check that the SD card you inserted matches the one selected by the Tool.
7. Click the “Format” button.
8. Download the NOOBS_v1_2_1.zip from (downloads.raspberrypi.org/recovery).
9. Unzip the RPi recovery system or NOOBS_v1_2_1.zip.
10. Copy the extracted files onto the SD card that you just formatted.
11. Insert the SD card into your Pi.
12. Connect all the connections which is mouse, keyboard and monitor.
13. Finally connect the power supply to the RPi.
Setup - Raspbian
Once boot up for the first time, a menu will prompted(see the image below) you to install one of several operating systems into the free space on the card. The choice means you can boot the Pi with a regular operating system like Raspbian, or with a media-centre specific OS like RaspBMC.

Once Boot up, we now have most low cost computer running.

Subscribe to:
Posts (Atom)